
How to Install and Setup WP Super Cache for Beginners?
Are you searching for a means to set up WP Super Cache on your WordPress site?
Online search engine like Google now consider site speed to be an important ranking element. WP Super Cache can make your site run quicker, enhance your site's search engine optimization, and also improve the user experience.
In this post, we'll reveal you exactly how to set up as well as set up WP Super Cache on your website.
What is WP Super Cache as well as Why You Should Utilize It?
WP Super Cache is just one of one of the most preferred and also the very best WordPress caching plugins. It's a totally free plugin as well as has over 2 million energetic installs.
WP Super Cache makes a copy of each page on your site in the form of a fixed HTML documents. This way, whenever a person check outs your site, they're offered the copied variation swiftly instead of generating the entire web site from scratch.
As a result, your WordPress website's rate and also performance boost significantly. The cache plugin skips a lot of actions behind the scenes to make sure that your visitors do not need to wait on the web page to open.
With a fast-loading website, you can see a boost in your WordPress SEO and internet search engine rankings. Google offers a significant benefit to quicker web sites, as it uses web site rate as a ranking variable.
Besides that, you'll also boost the experience of your internet site visitors. A site that lots promptly motivates people to see it more frequently. This way, you get even more involvement and conversions as individuals invest more time on web pages.
Currently, are you ready to establish WP Super Cache on your site? Allows find out.
Establishing WP Super Cache-- The Easy Method
The first thing you require to do is mount and turn on WP Super Cache plugin on your website. For more information, you can follow our overview on exactly how to mount a WordPress plugin.
Upon activation, WP Super Cache will certainly notify you that caching is not enabled on your web site at the moment.
To enable cache, most likely to Settings" WP Super Cache. Then under the Easy tab, go on and also click on the 'Caching On' alternative. Once you have actually done that, click the 'Update Condition' button.

After activating the cache, you'll need to scroll to the Cache Tester area and then click the 'Test Cache' switch to examine if it is working.
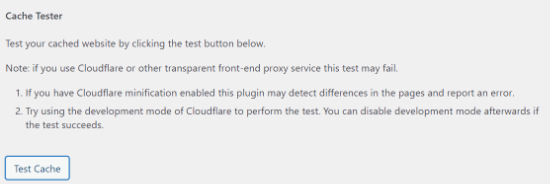
WP Super Cache will fetch your WordPress website twice and also will contrast the timestamps of both web pages. If both timestamps match, then this suggests that caching is working on your site now.
WP Super Cache Advanced Set up
WP Super Cache is a powerful WordPress plugin that includes numerous advanced options. These options can even more enhance your site's performance as well as supply even more control over exactly how the plugin will certainly cache your site.
Enable Caching
To set up WP Super Cache with innovative alternatives, most likely to the Advanced tab in the WP Super Cache plugin. Next, click the checkbox for 'Enable Caching.'
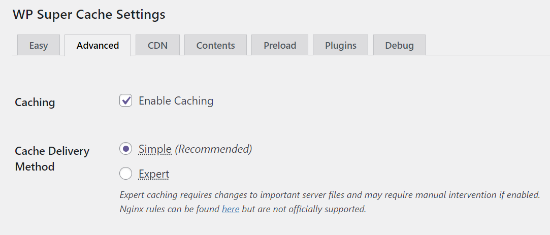
Below caching, you'll see choices for Cache Shipment Method. We recommend making use of the 'Simple' option if you're a novice and also unfamiliar with modifying your web server data.
Enable Compression in WP Super Cache
Compression permits WP Super Cache to offer cached documents as pressed files, which enhances lots time. These files are downloaded and install by internet browsers faster as a result of their smaller size.
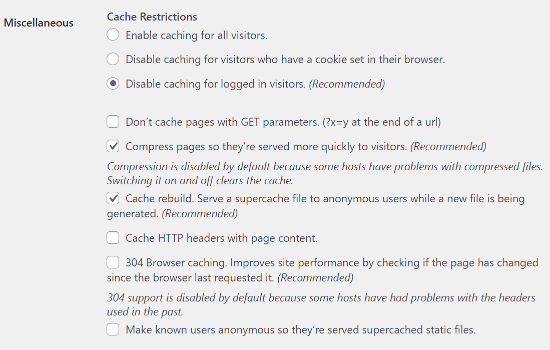
To enable compression, scroll down to the Miscellaneous section and also check package that claims 'Compress web pages, so they're served quicker to visitors.'
Enable Dynamic Caching
If you intend to maintain certain parts of a website dynamic throughout caching, then WP Super Cache uses an alternative for it.
To allow the option, you can head over to the Advanced section and also click the checkbox for 'Enable dynamic caching.'
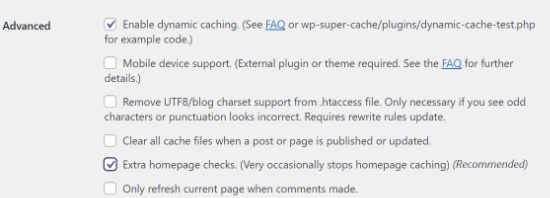
Allowing dynamic caching serves in specific situations, particularly if you have pages that contain frequently altering web content. For example, you can accelerate web pages which contain ads by enabling vibrant caching.
Establish Expiry Time & Trash
WP Super Cache allows you establish the expiry time and regularity of deleting cached pages from your web server.
To begin, just scroll to the 'Expiration Time & Trash' area under the Advanced tab to configure it.
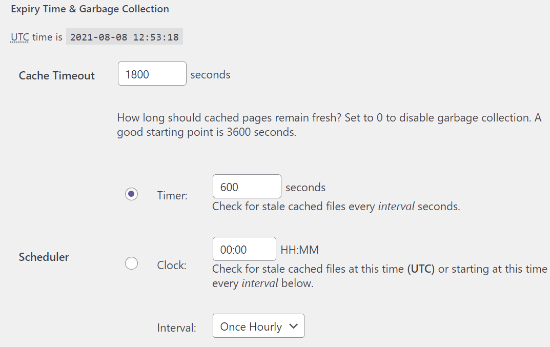
The 'Cache Timeout' informs the plugin to get rid of the cached page as well as do a fresh cache. The plugin will certainly set it to 1800 seconds by default, which is great for a high-traffic internet site.
Nevertheless, if you have a brand-new internet site that doesn't get a lot of website traffic, then 3600 secs is a good beginning point.
Aside from that, you can arrange a time for the plugin to look for stale cached data as well as remove them.
Specify Pages You Do Not Wish To be Cached
By default, the plugin will cache all the pages on your site. This can boost the size of your cache data and also make use of more resources. Nevertheless, WP Super Cache allows you to add web pages that you do not want to be cached.
You can scroll to the 'Denied URL Strings' area in the Advanced tab to start. In the text box, go on and go into the link string of the pages that you do not the plugin to cache.
For instance, if you have an e-commerce store, after that you can exclude web pages that site visitors do not usually visit as well as conserve web server sources. These can be the checkout page, account page, and thank you page.
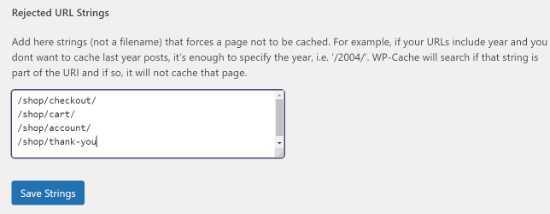
When you're done, don't forget to click the 'Save Strings' switch.
Establishing CDN with WP Super Cache
These data are JavaScript's, photos, stylesheets, and also more. Unlike your WordPress posts which are dynamically generated by PHP, these documents can be served making use of a Content Distribution Network (CDN) service.
A CDN is a network of geographically distributed web servers that assist rapidly provide material to your visitors. For more details on exactly how it works, look into our infographic on what the Hell is a CDN.
Keep in mind: Setting up a CDN with WP Super Cache is a little bit technological and will call for some experience with CDNs. If you would certainly choose an easier technique, then Cloud Flare is a cost-free CDN service provider that's easy to establish. See our tutorial on just how to set up Cloud Flare's totally free CDN on your WordPress site.
To set up CDN with WP Super Cache, go on as well as click on the CDN tab and afterwards check package beside the 'Enable CDN Support' option.
Now enter your offsite URL, which will certainly be the link of your pull zone. A pull area tells the CDN where to find your documents and also just how to serve them to your individuals. As an example, you can get in the following: https://cdn.wpbeginner.com
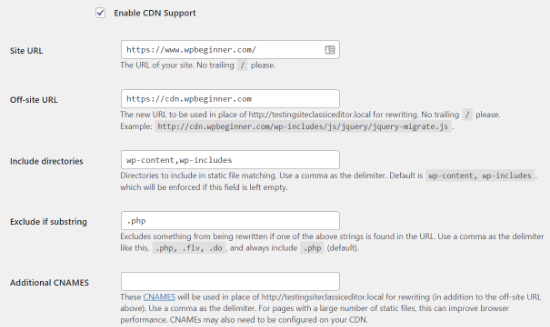
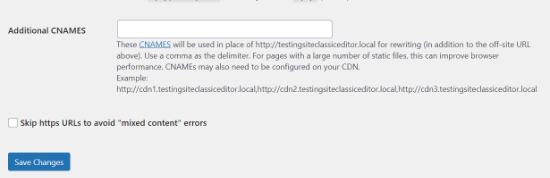
In the Additional CNAMEs area, get in other CNAMEs you have actually developed for your pull zone. For instance, http://cdn1.wpbeginner.com, http://cdn2.wpbeginner.com, http://cdn3.wpbeginner.com.
You can leave the various other setups to default. Lastly, check package that claims 'Skip https Links to avoid "mixed content" mistakes' as well as save modifications.
Now your internet site is ready to serve static web content from a CDN.
Offer a Static Site with WP Super Cache
The preload setting in WP Super Cache allows you to develop extremely cache static apply for all your blog posts and web pages and also serve a fixed website. This way, your material will load promptly whenever someone check outs your website.
An extremely cache static data aids preserve server sources, serve an old website that is not being upgraded any longer, and enhance site speed by offering static material just.
To begin, head over to the 'Preload' tab in the WP Super Cache plugin. Next, you can set the moment for revitalizing the preload cache files.
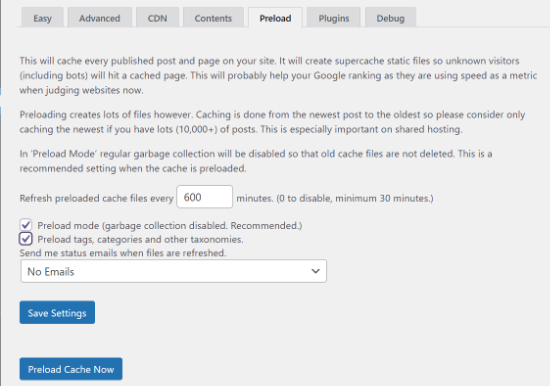
By default, the plugin will set it to 600 mins, but you can reduce the time if you release numerous posts daily.
Do remember that pre-loading your entire WordPress site takes a while and also consumes a great deal of sources on your server. You can leave it to 0 if you do not want your fixed data to expire ever before unless you manually rejuvenate the cache.
After that, ensure that you check packages for 'Preload mode (garbage collection disabled. Recommended).' You can also enable preloads for different tags, classifications, and other taxonomies on your web site.
The plugin likewise provides a choice to get e-mail informs whenever your documents are freshened. By default, it will make use of the 'No Email' setting, but you can alter it by picking a choice from the dropdown food selection.
When you're done, proceed as well as conserve your settings and afterwards click the 'Preload Cache Currently' button.
We wish this overview assisted you set up WP Super Cache on your WordPress blog. You might also wish to take a look at our tutorial on just how to relocate a WordPress site from HTTP to HTTPS, or see our expert choice of the very best domain registrars.


No comments: